
Connecting Firebase lets your SiteTo.App app receive push notifications on Android and iOS. It also gives SiteTo.App a secure server credential for sending one broadcast to all subscribed devices.
Before you begin
You will need:
- A Google account with permission to create or manage a Firebase project
- The Android package name and iOS bundle ID used by your SiteTo.App app
- An Apple Developer Program membership if you are setting up iOS notifications
- Your app set up in SiteTo.App
Use the exact same package name or bundle ID in Firebase and SiteTo.App. Both identifiers are case-sensitive, and Firebase does not let you change them after that platform app is registered.
Understand the three SiteTo.App credentials
SiteTo.App's Connect → Firebase screen has three upload fields:
- Android config — the
google-services.jsonfile for your registered Firebase Android app - iOS config — your Apple Push Notification service credential in
.p8or.p12format - Firebase Admin SDK key — the private service-account JSON used by SiteTo.App's server to send broadcasts
The two JSON files are not interchangeable. google-services.json configures the Android app; the Admin SDK JSON authorizes trusted server operations and must remain private.
For iOS, Firebase also generates GoogleService-Info.plist when you register the app. Download and keep that file with your iOS project assets. The current SiteTo.App Firebase connection screen asks you to upload the APNs credential, not the plist.
1. Create or select a Firebase project
- Open the Firebase Console and sign in.
- Select an existing project for this app, or choose Create a project.
- Follow the prompts. Google Analytics is optional for push-notification setup.
- From Project overview, choose Add app when you are ready to register Android and iOS.
Use one Firebase project for both platform versions of the same app. This keeps their Cloud Messaging configuration and server credential together.
2. Register the Android app
- In Project overview, choose the Android icon or select Add app → Android.
- Enter the exact Android package name used by your SiteTo.App app, such as
com.yourcompany.yourapp. - Add an optional nickname to make the app easier to recognize.
- Select Register app.
- Select Download google-services.json and keep the original filename.
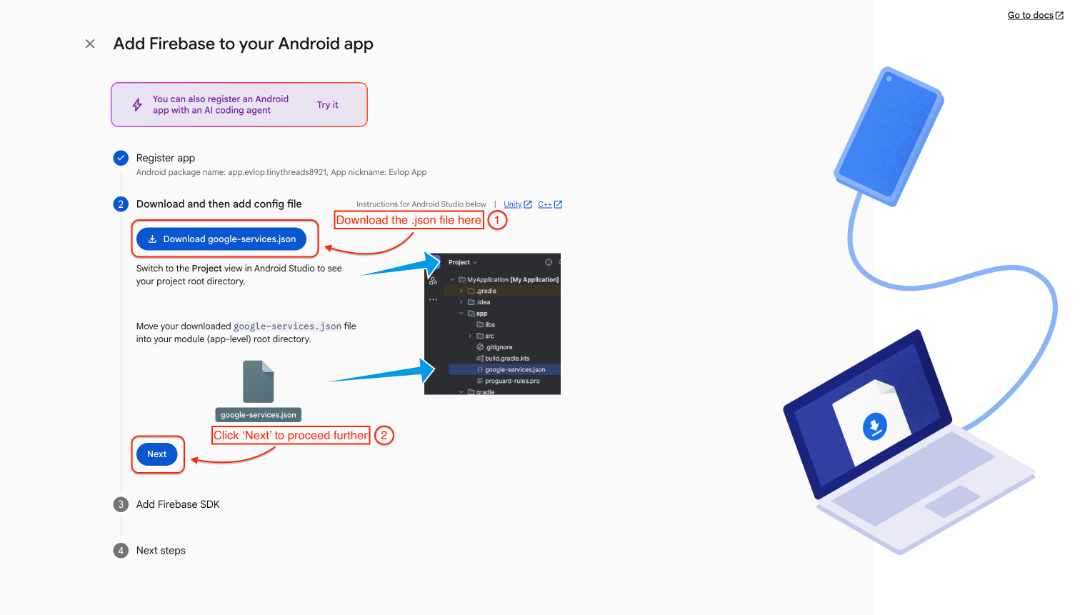
You can download this file again later from Project settings → General → Your apps. If your browser adds text such as (1) to the filename, rename it back to google-services.json before uploading it to SiteTo.App.
3. Register the iOS app
- Return to Project overview and choose Add app → iOS+.
- Enter the exact bundle ID used by your SiteTo.App iOS app.
- Add an optional nickname. The App Store ID can be added later if the app has not been published yet.
- Select Register app.
- Download
GoogleService-Info.plistand keep it with your app's iOS project assets.
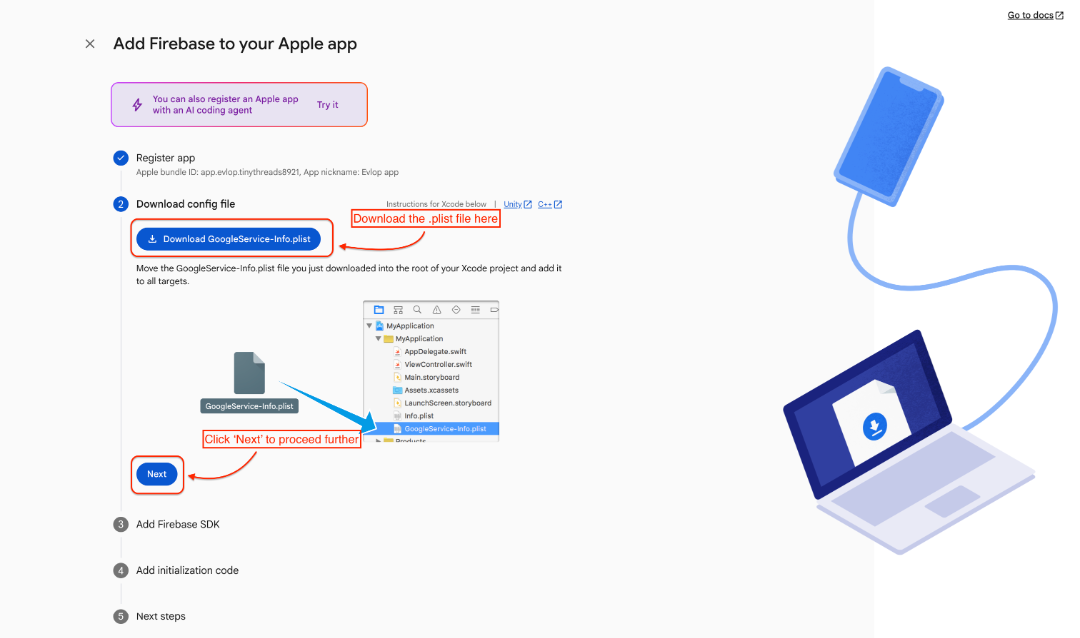
The bundle ID is case-sensitive and cannot be changed for this Firebase app after registration. If it does not match SiteTo.App, remove the incorrect Firebase app registration and add a new one with the correct ID.
4. Create an APNs credential for iOS
Android setup can skip this section. For iOS, Firebase Cloud Messaging needs permission to deliver notifications through Apple's Push Notification service.
- Sign in to Apple Developer and open Certificates, Identifiers & Profiles.
- Select Keys, then use the add button (
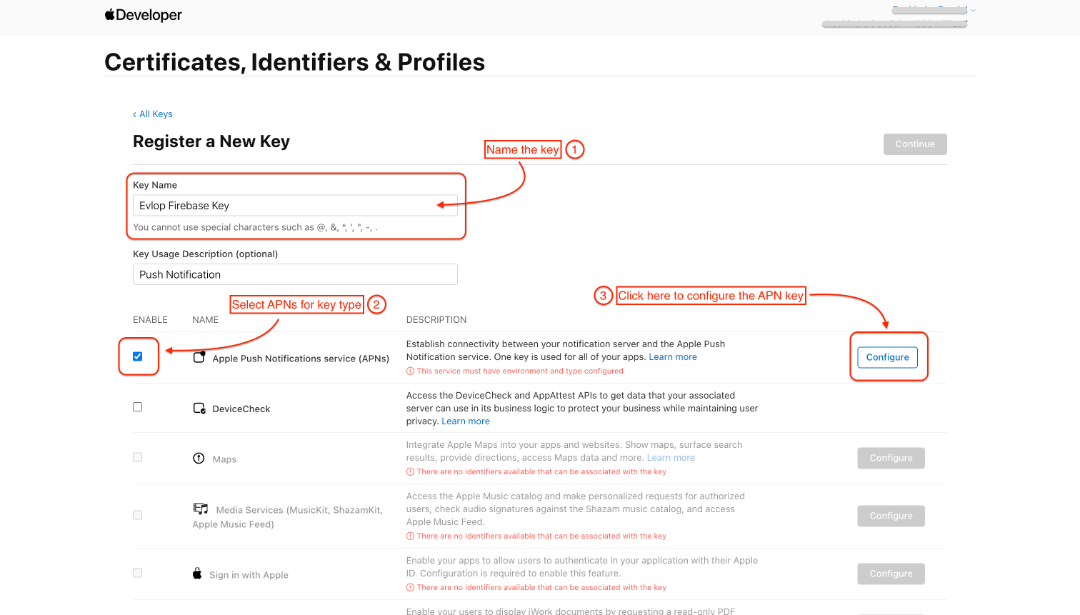
+) to register a new key. - Give the key a recognizable name such as SiteTo.App push notifications.
- Enable Apple Push Notifications service (APNs) and choose Configure if Apple asks for its environment or scope.
- Select Continue, review the settings, and select Register.
- Download the
.p8key and store it securely. - Copy its Key ID and your Apple Developer Team ID.
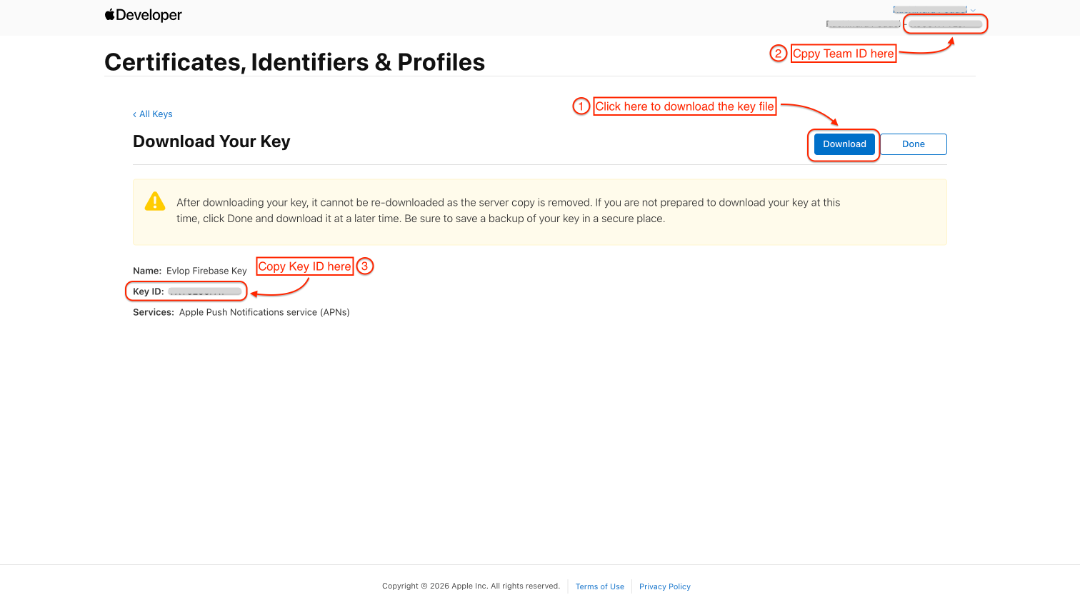
Apple normally allows the .p8 private key to be downloaded only once. If you lose it, create a replacement rather than trying to reconstruct the file.
5. Upload the APNs credential to Firebase
- Return to the Firebase Console and open your project.
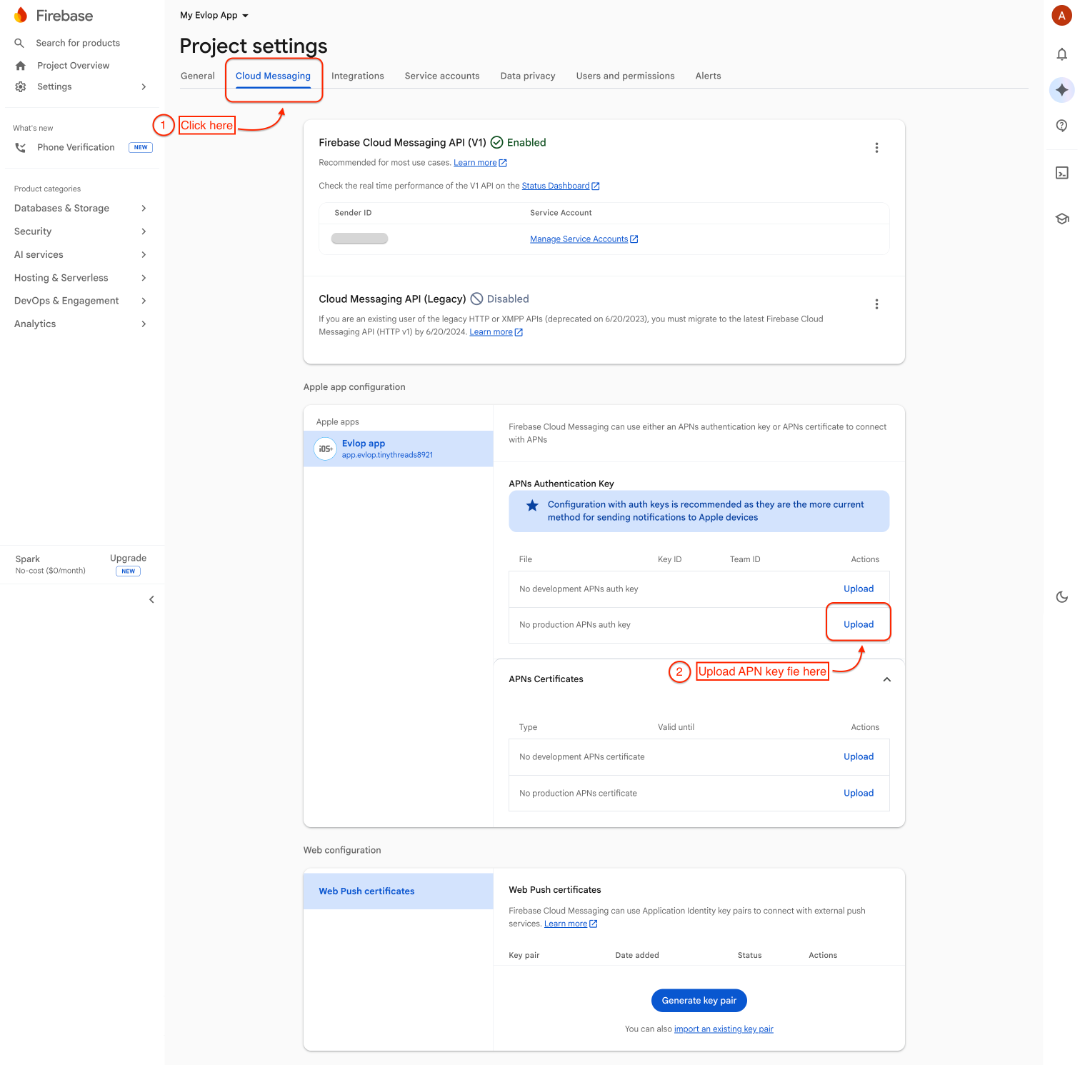
- Open Project settings, then select Cloud Messaging.
- Find your iOS app under Apple app configuration.
- Under APNs authentication key, select Upload.
- Choose the
.p8file, enter the Key ID and Team ID you recorded, and finish the upload.
If you use an APNs certificate instead of a token key, export it as a password-protected .p12 file. SiteTo.App accepts .p8 and .p12, but a .p8 key is usually easier to maintain because it does not expire annually.
6. Generate the Firebase Admin SDK key
This key lets SiteTo.App's server send notification broadcasts. Generate it from the same Firebase project that contains the Android and iOS apps.
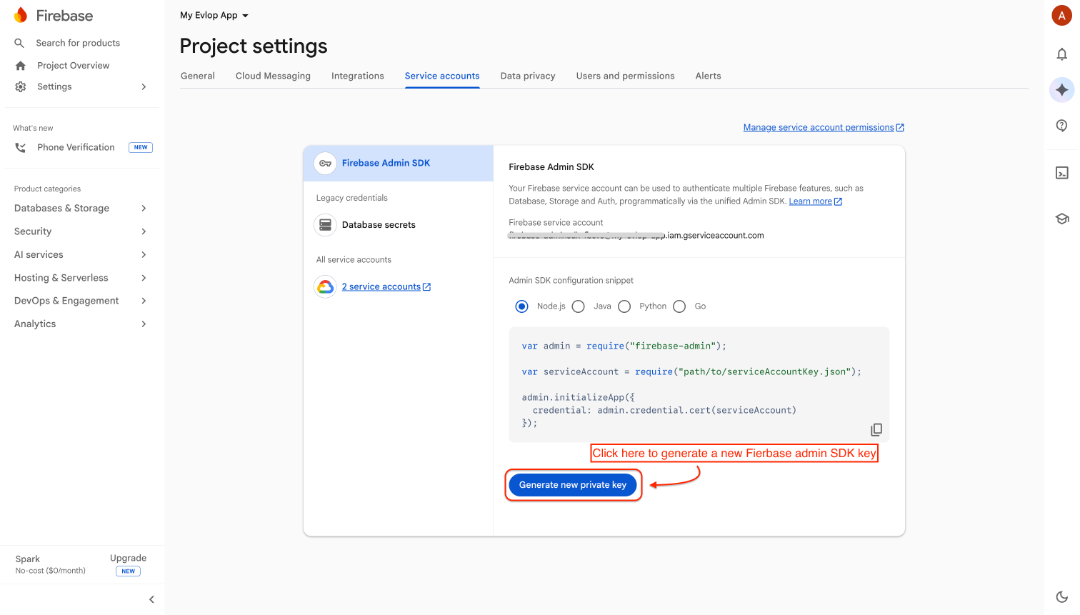
- In the Firebase Console, open Project settings.
- Select Service accounts.
- In the Firebase Admin SDK section, select Generate new private key.
- Confirm by selecting Generate key.
- Save the downloaded JSON file somewhere private.
This JSON is a private server credential. Do not confuse it with google-services.json, place it in the mobile app, commit it to a repository, or share it over email or chat.
7. Connect Firebase in SiteTo.App
- Sign in to SiteTo.App.
- Open the app you want to configure.
- In the app editor, open Connect and choose Firebase.
- Under Android config, upload
google-services.jsonfrom step 2. - Under iOS config, upload the
.p8or.p12APNs credential from step 4. - Under Firebase Admin SDK key, upload the service-account JSON from step 6.
- Select Save setup.
Each row will show the uploaded filename or Configured. Make sure all three credentials belong to the same app, Firebase project, and Apple developer team before starting a production build.
What happens next
SiteTo.App keeps the Admin SDK credential on the server and uses it to send broadcast messages through Firebase Cloud Messaging. Installed Android and iOS apps subscribe to a shared topic, so one send can reach both platforms.
Connecting Firebase does not send a notification immediately. Finish the app setup and build, install the new build on a real device, grant notification permission when prompted, and then send a test broadcast.
Troubleshooting
Android devices do not receive notifications
Confirm that google-services.json came from the Android app registration with the same package name as SiteTo.App. A file from another Firebase project or another build variant will point the app to the wrong sender.
iOS devices do not receive notifications
Check that the bundle ID matches exactly, the APNs credential appears under Project settings → Cloud Messaging, and its Key ID and Team ID are correct. Test on a physical Apple device and allow notifications when prompted.
SiteTo.App says the Admin SDK file is invalid
Upload the service-account JSON generated under Project settings → Service accounts. The Android google-services.json file is valid JSON too, but it is not an Admin SDK credential.
The files upload, but sending fails
Verify that the Admin SDK key is still active and belongs to the same Firebase project as the mobile configuration. If the key was revoked or exposed, generate a replacement and upload it in SiteTo.App.
You lost the Apple .p8 key
Apple does not provide a second download. Create a new APNs key, upload it to Firebase, then replace the iOS configuration file in SiteTo.App.
Keep your credentials secure
- Treat the Admin SDK JSON and APNs
.p8or.p12file like passwords. - Store private credentials in a password or secrets manager.
- Never place the Admin SDK JSON in a mobile app or public repository.
- Use a dedicated service-account key for SiteTo.App so it can be rotated independently.
- Revoke and replace any private key that may have been exposed.
For the latest platform instructions, see Firebase's official guides for adding an Android app, adding an Apple app, uploading an APNs authentication key, and generating an Admin SDK private key.
The console screenshots in this guide were selected from the Evlop Android Firebase, Evlop iOS Firebase, Evlop Apple APNs, and Evlop Admin SDK articles supplied as visual references. Firebase and Apple may update labels or page layouts over time.